이전에 진행됐던 `톰캣 구현하기` 미션에 이어 `MVC 구현하기` 미션이 시작됐다.


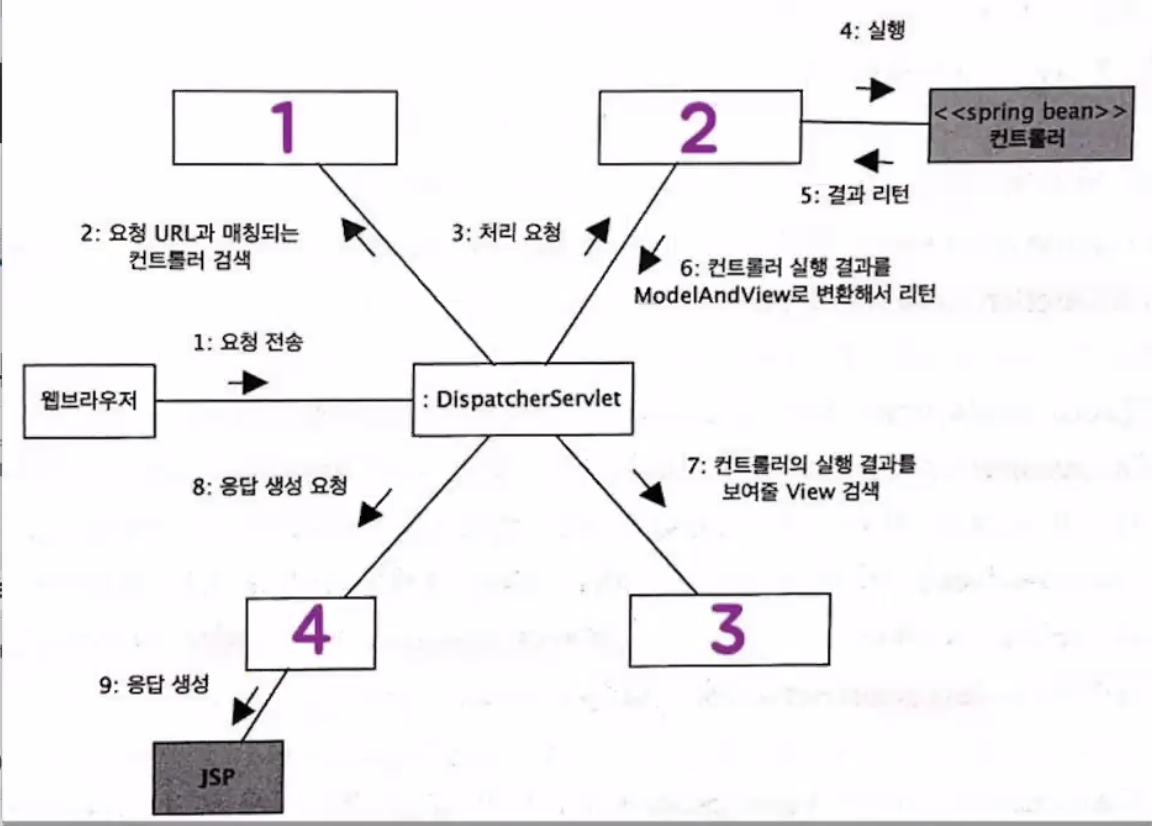
여기에서 1번은 HandlerMapping, 2번은 HandlerAdapter이다.
이번 미션에서는 위를 구현해보고 리팩터링하여 컨트롤러가 어떻게 찾아와지는지, 해당 메서드를 어떻게 실행시키고 ModelAndView로 반환시키는지 확인해보는 미션이다. 환경은 JSP 파일을 렌더링한 응답을 보내줘야 하는 SSR 환경이라고 가정한다.
1단계 - @MVC 프레임워크 구현하기
요구사항
- AnnotationHandlerMappingTest가 정상 동작한다.
- DispatcherServlet에서 HandlerMapping 인터페이스를 활용하여 AnnotationHandlerMapping과 ManualHandlerMapping 둘다 처리할 수 있다.
현재의 스프링에서는 @RequestMapping, @Controller 어노테이션 기반으로 Handler가 컨트롤러를 찾아준다. 어떻게 이렇게 편리하게 찾아줄 수 있을까? 1단계는 HandlerMapping을 레거시 MVC를 개선해서 어노테이션 기반으로 컨트롤러를 찾아올 수 있도록 구현하는 것이다.
미션에 주어진 레거시 코드는 아래와 같다.
DispatcherServlet의 service 메서드
|
1
2
3
4
5
6
7
8
9
10
11
12
13
14
15
16
17
18
19
20
21
22
|
@Override
protected void service(final HttpServletRequest request, final HttpServletResponse response) throws ServletException {
log.debug("Method : {}, Request URI : {}", request.getMethod(), request.getRequestURI());
try {
final var controller = getController(request);
final var viewName = controller.execute(request, response);
move(viewName, request, response);
} catch (Throwable e) {
log.error("Exception : {}", e.getMessage(), e);
throw new ServletException(e.getMessage());
}
}
private Controller getController(final HttpServletRequest request) {
return handlerMappings.stream()
.map(handlerMapping -> handlerMapping.getHandler(request))
.filter(Objects::nonNull)
.map(Controller.class::cast)
.findFirst()
.orElseThrow();
}
|
cs |
Dispatcher의 service에서 컨트롤러들을 구해와서 실행시키고 view를 얻어오는 로직이다.
getController 메서드를 보면 handlerMapping을 통해서 적절한 컨트롤러를 찾아오는 것을 확인할 수 있다.
즉, 우리가 집중해서 구현해야 할 부분은 handlerMapping이라는 점이다.
레거시 코드의 ManualHandlerMapping을 보자.
ManualHandlerMapping
|
1
2
3
4
5
6
7
8
9
10
11
12
13
14
15
16
17
18
19
20
21
22
|
private static final Map<String, Controller> controllers = new HashMap<>();
@Override
public void initialize() {
controllers.put("/", new ForwardController("/index.jsp"));
controllers.put("/login", new LoginController());
controllers.put("/login/view", new LoginViewController());
controllers.put("/logout", new LogoutController());
controllers.put("/register/view", new RegisterViewController());
controllers.put("/register", new RegisterController());
log.info("Initialized Handler Mapping!");
controllers.keySet()
.forEach(path -> log.info("Path : {}, Controller : {}", path, controllers.get(path).getClass()));
}
@Override
public Controller getHandler(HttpServletRequest request) {
final String requestURI = request.getRequestURI();
log.debug("Request Mapping Uri : {}", requestURI);
return controllers.get(requestURI);
}
|
cs |
컨트롤러 클래스와 연결되는 URI 주소를 핸들러매핑 Map에 일일이 넣어주는 것을 확인할 수 있다.
즉, 요청에 대한 요구사항이 새롭게 추가될 때마다 컨트롤러 클래스를 새롭게 만들어줘야 하고, 그 때마다 HandlerMapping 클래스의 수정이 필요하다는 점이다. 이는 변경에 유연하지 못한 코드이다. 우리는 비즈니스 로직에만 집중하고 싶다.
컨트롤러 클래스에 어노테이션만 붙여주면 HandlerMapping에서 인식해줄 수 있도록 AnnotationHandlerMapping 클래스를 새롭게 만들어주자.
AnnotationHandlerMapping의 컨트롤러 주입 코드
|
1
2
3
4
5
6
7
8
9
10
11
12
13
14
15
16
17
18
19
20
21
22
23
24
25
26
27
28
29
|
public void initialize() {
final Reflections reflections = new Reflections(basePackage);
reflections.getTypesAnnotatedWith(Controller.class)
.stream()
.map(Class::getMethods)
.flatMap(Arrays::stream)
.filter(method -> method.isAnnotationPresent(RequestMapping.class))
.forEach(this::addHandler);
log.info("Initialized AnnotationHandlerMapping!");
}
private void addHandler(final Method method) {
final RequestMapping requestMapping = method.getDeclaredAnnotation(RequestMapping.class);
Arrays.stream(requestMapping.method())
.map(requestMethod -> new HandlerKey(requestMapping.value(), requestMethod))
.collect(Collectors.toUnmodifiableList())
.forEach(it -> handlerExecutions.put(it, new HandlerExecution(findController(method), method)));
}
private Object findController(final Method method) {
try {
return method.getDeclaringClass()
.getConstructor()
.newInstance();
} catch (final InstantiationException | IllegalAccessException | InvocationTargetException | NoSuchMethodException e) {
throw new RuntimeException();
}
}
|
cs |
@Controller 어노테이션이 붙은 컨트롤러들을 찾아와서 @RequestMapping 어노테이션이 붙은 각각의 메서드를 통해 handlerExecution을 매핑해주는 코드이다. 이는 리플렉션을 활용하여 작성할 수 있다.
원래는 핸들러매핑에서 컨트롤러들을 모두 찾아오고, 각각의 handlerExecution을 매핑해주는 부분은 HandlerExecution에서 작동하는 코드를 짰었다. 하지만 이렇게 되면 매번 execution이 실행될 때마다 컨트롤러를 인스턴스화하는 불필요한 작업이 추가된다.

파랑의 코드리뷰 덕분에 AnnotationHandlerMapping에서 컨트롤러를 인스턴스화한 후, 각각의 컨트롤러에 대한 execution을 넣어주어 HandlerExecution에서는 method.invoke()작업만 해주도록 수정해주었다. 매 실행마다 findController() 메서드로 컨트롤러를 인스턴스화하는 불필요한 작업이 사라진 것.
이제 DispatcherServlet에서 해당 핸들러매핑으로도 처리할 수 있도록 AppWebApplicationInitializer에 AnnotationHandlerMapping을 추가해주면 된다.
어? 핸들러매핑이 컨트롤러를 찾아오면 이를 바탕으로 컨트롤러를
실행해주고 결과를 리턴해주는 Adapter가 필요한 게 아닌가?
위 생각이 들 수 있다.
이는 2단계 요구사항에 언급된다.
2단계 - 점진적인 리팩터링
요구사항
- ControllerScanner 클래스에서 @Controller가 붙은 클래스를 찾을 수 있다.
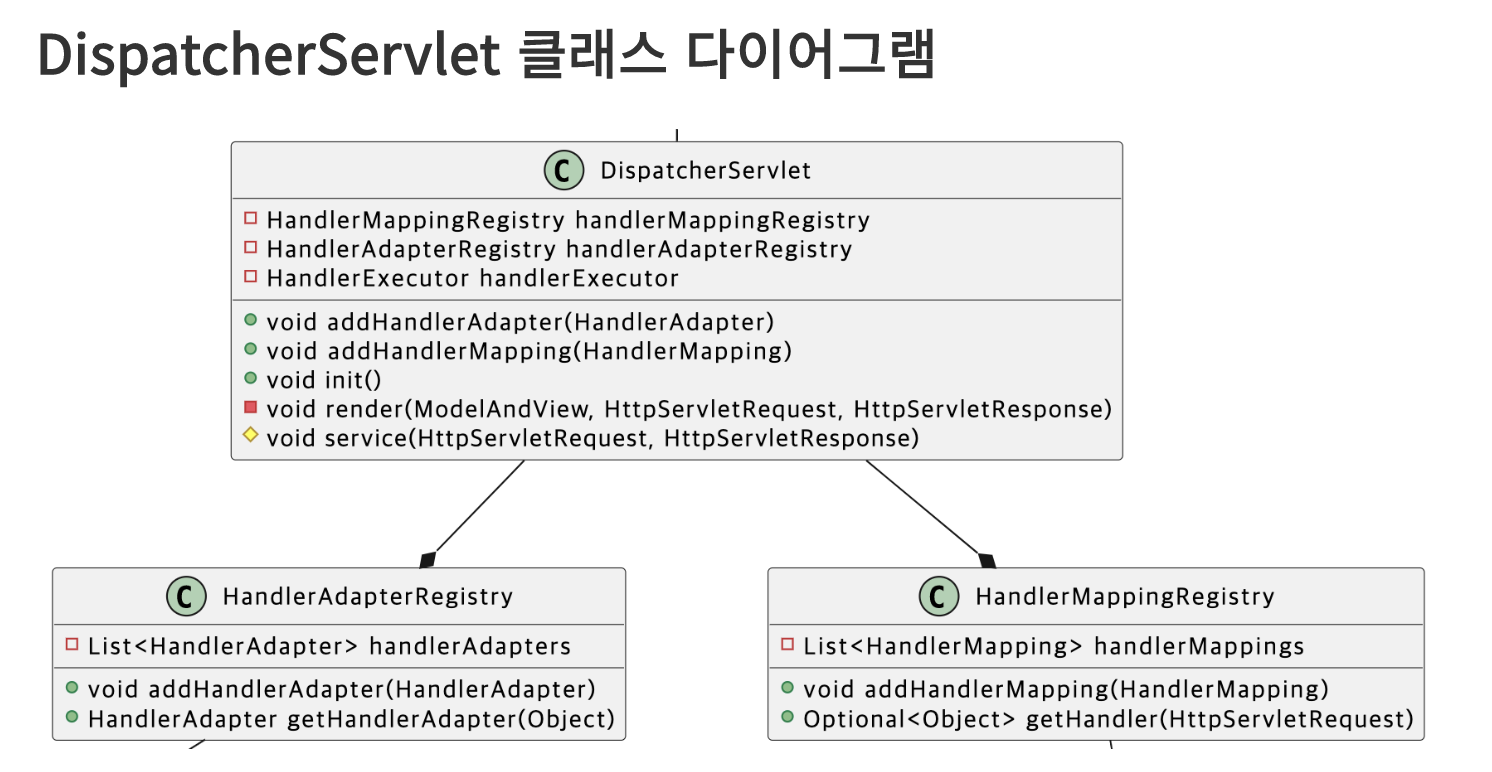
- HandlerMappingRegistry 클래스에서 HandlerMapping을 처리하도록 구현했다.
- HandlerAdapterRegistry 클래스에서 HandlerAdapter를 처리하도록 구현했다.
1단계에서 작성한 AnnotationHandlerMapping 클래스에서는 아래와 같은 로직들이 모두 존재했다.
- 리플렉션을 활용하여 컨트롤러를 찾는 로직
- 컨트롤러에 있는 RequestMapping 어노테이션이 붙은 메서드들에 대한 handlerExecution을 각각 매핑해주는 로직
- 요청에 대한 handlerExecution을 찾아 실행하는 로직
2단계에서는 보다 객체지향적인 설계를 위해 1번을 ControllerScanner, 3번을 HandlerAdapter에 위임해줄 것이다.
위와 같이 하면 리플렉션을 활용하는 로직은 자연스럽게 ControllerScanner로 이동되고, HandlerMapping에서는 각 핸들러에 대한 handlerExecution을 매핑해주는 역할만 맡게 된다.
AnnotationMapping에서의 HandlerExecution을 매핑해주는 메서드
|
1
2
3
4
5
|
public Object getHandler(final HttpServletRequest request) {
final String requestURI = request.getRequestURI();
final RequestMethod requestMethod = RequestMethod.valueOf(request.getMethod());
return handlerExecutions.get(new HandlerKey(requestURI, requestMethod));
}
|
cs |
HttpServletRequest의 uri, Http Method를 이용하여 이에 대한 적절한 execution을 찾아오도록 했다.
또한, 아래와 같이 어댑터를 만들어줌으로써 3번 역할을 위임해주도록 하자.
|
1
2
3
4
5
6
7
8
9
10
11
12
13
14
15
16
|
public class HandlerExecutionAdapter implements HandlerAdapter {
@Override
public boolean supports(final Object handler) {
return handler instanceof HandlerExecution;
}
@Override
public ModelAndView handle(final HttpServletRequest request, final HttpServletResponse response,
final Object handler)
throws Exception {
final HandlerExecution handlerExecution = (HandlerExecution) handler;
return handlerExecution.handle(request, response);
}
}
|
cs |
그리고 HandlerMappingRegistry, HandlerAdapterRegistry 클래스를 만들어서 Annotation 기반으로 작동되는 핸들러매핑, 핸들러어댑터 뿐만 아니라 기존의 레거시 코드로도 작동되도록 기존 핸들러매핑, 핸들러어댑터도 registry에 관리되도록 하자.

해당 관련 PR은 여기서 볼 수 있다.
https://github.com/woowacourse/jwp-dashboard-mvc/pull/194
[MVC 구현하기 - 2단계] 케이(김태현) 미션 제출합니다. by kth990303 · Pull Request #194 · woowacourse/jwp-dash
안녕하세요 파랑 2단계 요구사항을 충족한 듯해서 제출합니다. 파랑의 코드리뷰를 받으면서 더 개선해나가고 싶습니다. 감사합니다 😄
github.com
3단계 - Json View 구현하기
요구사항
- JspView 클래스를 구현한다.
- JsonView 클래스를 구현한다.
- Legacy MVC를 리팩터링한다.
Jsp View는 "/index.jsp", "/register.jsp"와 같은 viewName을 받아서 적절한 파일을 찾아 응답을 처리해주는 역할을 하는 클래스이다. HttpServletRequest의 getRequestDispatcher를 이용하여 처리해주면 된다. getRequestDispatcher에 대한 정보는 아래 글을 참고하자.
https://dololak.tistory.com/502
[서블릿/JSP] RequestDispatcher란. RequestDispatcher로 forward() 하기
참고글 [서블릿/JSP] JSP 리다이렉트로 페이지 이동시키기 [서블릿/JSP] JSP 기본객체 종류 [HTTP] 리다이렉트(Redirect)란? RequestDispatcher란 RequestDispatcher는 클라이언트로부터 최초에 들어온 요청을 JSP..
dololak.tistory.com
JspView
|
1
2
3
4
5
6
7
8
9
10
11
12
13
14
15
16
17
18
19
20
21
22
23
24
|
@Override
public void render(final Map<String, ?> model, final HttpServletRequest request, final HttpServletResponse response)
throws Exception {
if (viewName.startsWith(REDIRECT_PREFIX)) {
redirectRender(response);
return;
}
addModelToRequest(model, request);
final RequestDispatcher dispatcher = request.getRequestDispatcher(viewName);
dispatcher.forward(request, response);
}
private void addModelToRequest(final Map<String, ?> model, final HttpServletRequest request) {
model.keySet().forEach(key -> {
log.debug("attribute name : {}, value : {}", key, model.get(key));
request.setAttribute(key, model.get(key));
});
}
private void redirectRender(final HttpServletResponse response) throws IOException {
final String location = viewName.substring(REDIRECT_PREFIX.length());
response.sendRedirect(location);
}
|
cs |
주의할 점은 "redirect:"로 시작하는 viewName일 경우 HttpServletResponse에서 "redirect:" 뒤에 있는 viewName으로 sendRedirect를 보내주어야 한다. 즉, 아래 테스트가 통과할 수 있도록 작성해야 된다.
JspViewTest
|
1
2
3
4
5
6
7
8
9
10
11
12
13
14
15
16
17
18
19
20
21
22
23
24
25
26
|
@Test
@DisplayName("forward 요청을 렌더링한다.")
void render() throws Exception {
final JspView jspView = new JspView("/index.jsp");
final HttpServletRequest request = mock(HttpServletRequest.class);
final HttpServletResponse response = mock(HttpServletResponse.class);
final RequestDispatcher requestDispatcher = mock(RequestDispatcher.class);
when(request.getRequestDispatcher("/index.jsp")).thenReturn(requestDispatcher);
jspView.render(Collections.emptyMap(), request, response);
verify(requestDispatcher).forward(request, response);
}
@Test
@DisplayName("redirect 요청일 경우 sendRedirect를 호출하여 처리한다.")
void renderWithRedirect() throws Exception {
final JspView jspView = new JspView("redirect:/index.jsp");
final HttpServletRequest request = mock(HttpServletRequest.class);
final HttpServletResponse response = mock(HttpServletResponse.class);
jspView.render(Collections.emptyMap(), request, response);
verify(response).sendRedirect("/index.jsp");
}
|
cs |
JsonView는 아래 힌트를 참고해서 작성해보았다.
- JSON을 자바 객체로 변환할 때 Jackson 라이브러리를 사용한다.
- Jackson 라이브러리 공식 문서를 읽어보고 사용법을 익힌다.
- JSON으로 응답할 때 ContentType은 MediaType.APPLICATION_JSON_UTF8_VALUE으로 반환해야 한다.
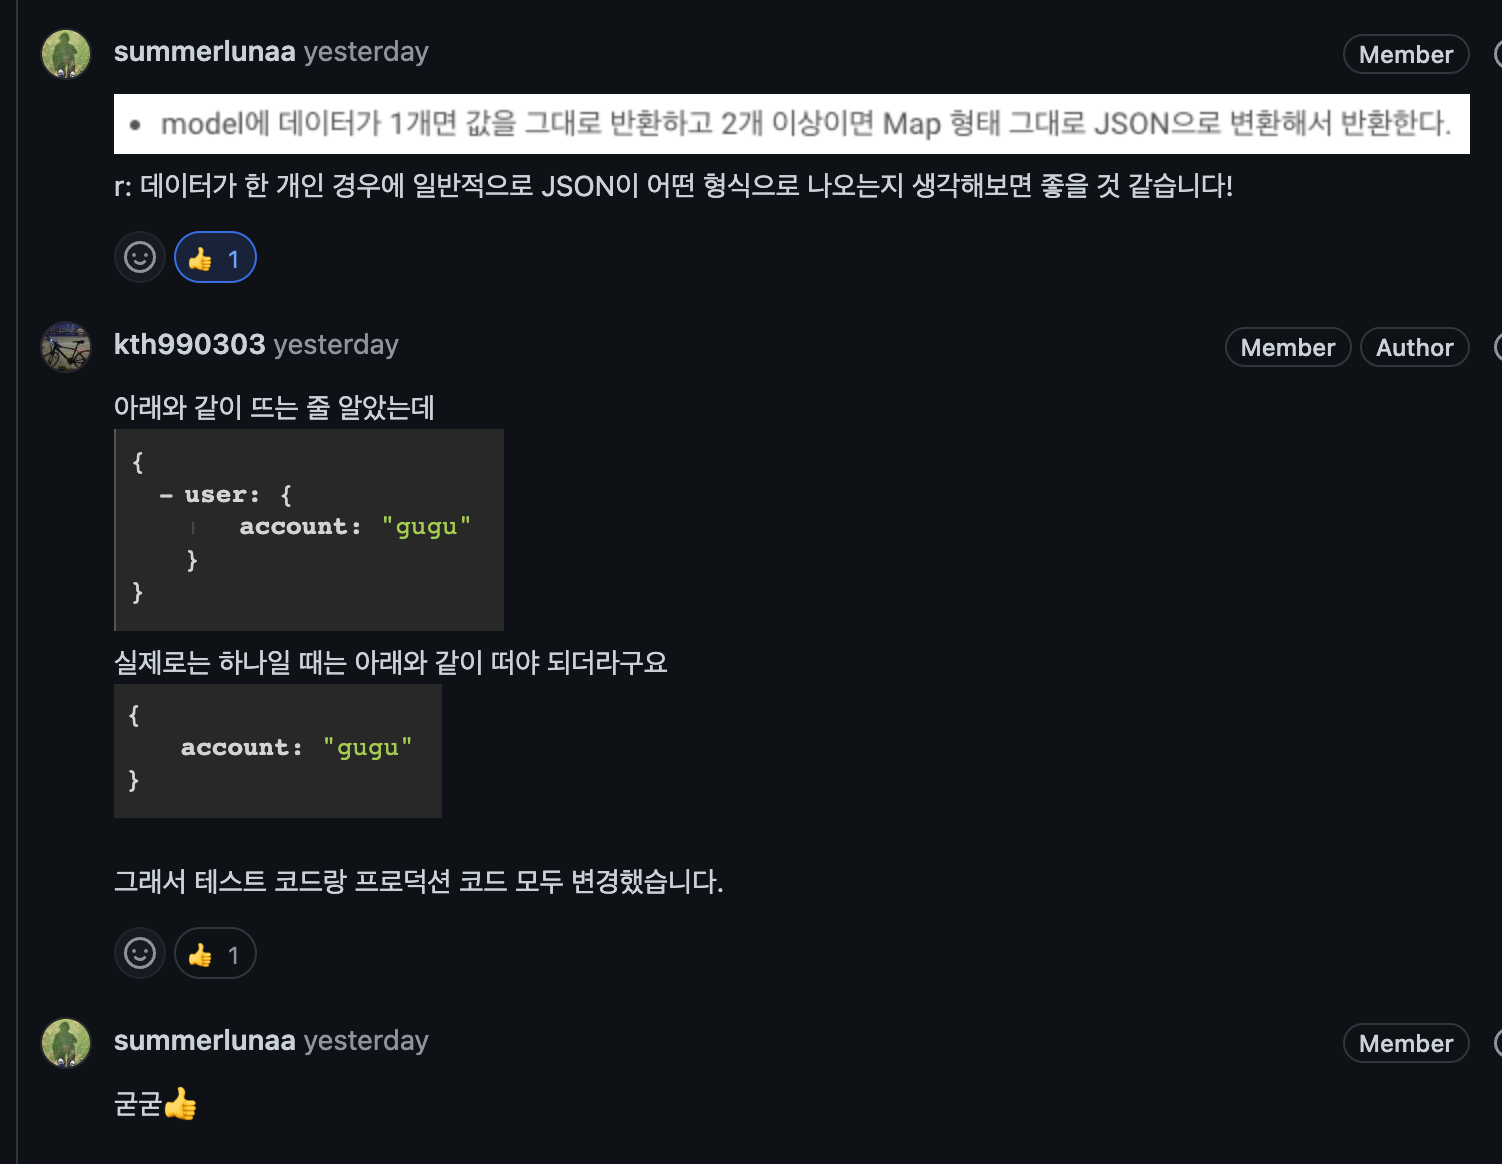
- model에 데이터가 1개면 값을 그대로 반환하고 2개 이상이면 Map 형태 그대로 JSON으로 변환해서 반환한다.
데이터가 1개일 때는 데이터를 그대로 반환하고, 2개일 때는 Map 형태 그대로 나와야 한다는 말이 이해가 가지 않을 수 있다.
예를 들어 `localhost:8080/api/user?account=gugu`와 같은 요청이 주어질 때 데이터는 user: {account: "gugu"}와 같이 user 정보가 하나 뿐이다. 이의 경우는 user를 출력해주지 않고 { account : "gugu" } 로만 출력하라는 말이다.
아래 코드리뷰를 보면 이해에 도움이 될 것이다.

이를 참고해서 JsonView를 작성해주면 된다.
테스트 코드는 아래와 같다.
JsonViewTest
|
1
2
3
4
5
6
7
8
9
10
11
12
13
14
15
16
17
18
19
20
21
22
23
24
25
26
27
28
29
30
31
32
33
34
35
36
37
38
39
40
41
42
43
44
45
46
47
48
49
50
51
|
@Test
@DisplayName("json 객체의 모델 데이터가 1개일 때 값을 그대로 반환한다.")
void renderWithSingularObject() throws Exception {
final HttpServletRequest request = mock(HttpServletRequest.class);
final HttpServletResponse response = mock(HttpServletResponse.class);
final StringWriter stringWriter = new StringWriter();
final PrintWriter printWriter = new PrintWriter(stringWriter);
final Map<String, String> expected = Map.of("parang", "koparang");
when(response.getWriter()).thenReturn(printWriter);
final Map<String, Object> model = new HashMap<>();
model.put("wooteco", expected);
jsonView.render(model, request, response);
assertThat(stringWriter.toString()).isEqualTo(objectMapper.writeValueAsString(expected));
}
@Test
@DisplayName("json 객체의 모델 데이터가 2개일 때 값을 그대로 반환한다.")
void renderWithPluralObject() throws Exception {
final HttpServletRequest request = mock(HttpServletRequest.class);
final HttpServletResponse response = mock(HttpServletResponse.class);
final StringWriter stringWriter = new StringWriter();
final PrintWriter printWriter = new PrintWriter(stringWriter);
when(response.getWriter()).thenReturn(printWriter);
final Map<String, Object> model = new HashMap<>();
model.put("wooteco", Map.of("parang", "koparang", "k", "kobaby"));
model.put("parang", Map.of("kotlin", 10, "alcohol", 9));
jsonView.render(model, request, response);
assertThat(stringWriter.toString()).isEqualTo(objectMapper.writeValueAsString(model));
}
@Test
@DisplayName("json 객체의 모델 데이터가 없을 때 빈 값을 반환한다.")
void renderWithNonObject() throws Exception {
final HttpServletRequest request = mock(HttpServletRequest.class);
final HttpServletResponse response = mock(HttpServletResponse.class);
final StringWriter stringWriter = new StringWriter();
final PrintWriter printWriter = new PrintWriter(stringWriter);
when(response.getWriter()).thenReturn(printWriter);
final Map<String, Object> model = new HashMap<>();
jsonView.render(model, request, response);
assertThat(stringWriter.toString()).isEqualTo("{}");
}
|
cs |
Json 객체의 모델 데이터가 없을 때에는 { } 를 반환해주는지, 데이터가 1개일 때는 의도한대로 값만 보내주는지 테스트 코드를 작성했다.

여담으로, 파랑이 해당 테스트 코드를 위와 같이 "k (케이): kobaby (코틀린응애)" 에서 "k (케이): KingOfAlgorithm" 데이터로 고쳐달라고 했다.
내가 유일하게 반영하지 않은 코드리뷰이다.
그랬더니 파랑이 싫어요 이모지를 눌러주었다.
해당 PR은 여기서 볼 수 있다.
https://github.com/woowacourse/jwp-dashboard-mvc/pull/276
[MVC 구현하기 - 3단계] 케이(김태현) 미션 제출합니다. by kth990303 · Pull Request #276 · woowacourse/jwp-das
안녕하세요 파랑!
github.com
여담
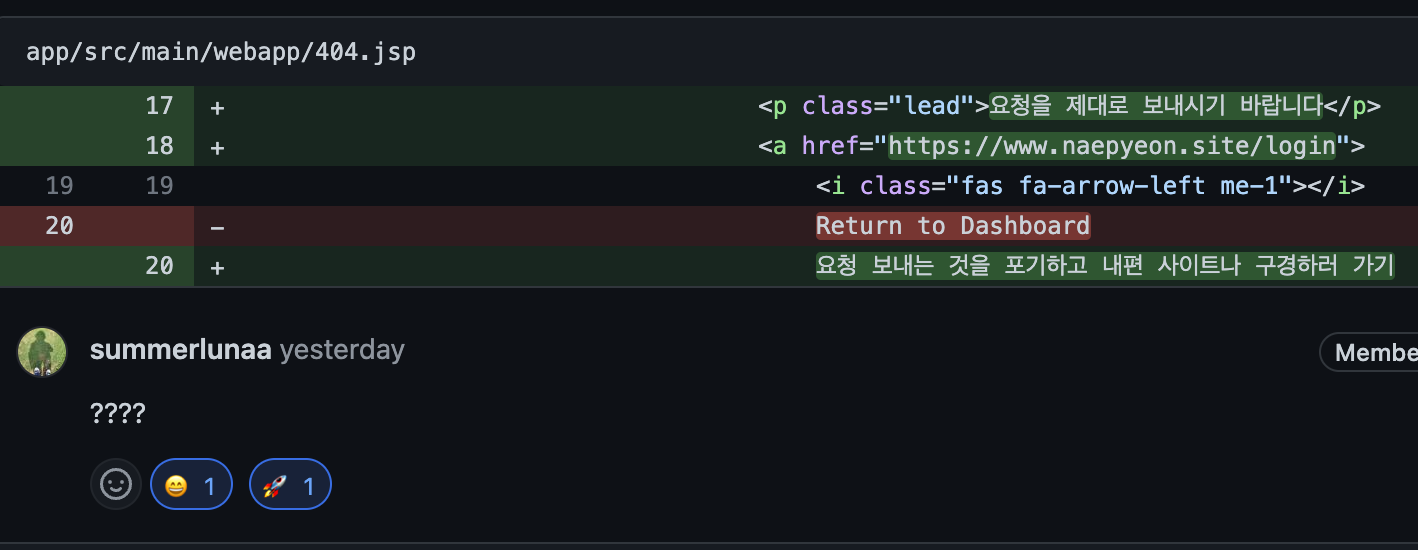
요청을 제대로 보내지 않았을 때(ex. user에 대한 정보를 포함하지 않은 상태로 user uri에 요청을 보낼 때) 아래와 같은 창이 뜨게 변경했다.

내편 사이트는 우리 팀이 만든 웹 프로젝트이다.

이렇게 제작했더니 파랑이 코드리뷰로 물음표를 달아주었다.
벌써 레벨4도 절반이 지나갔다.
이제 JDBC 라이브러리 구현하기 하나만 남았다.
남은 기간동안 기본기를 잘 갈고 닦는 것이 목표다.
'JAVA > 우아한테크코스 4기' 카테고리의 다른 글
| [221021] 우아한테크코스 4기 최종 데모데이 후기 (0) | 2022.10.29 |
|---|---|
| [220930] DB 제3정규화 위반 문제점을 무시하고 프로젝트 연관관계 수정한 삽질 후기 (7) | 2022.10.01 |
| [220913] 우아한테크코스 레벨4 - 톰캣 구현하기 미션 후기 (0) | 2022.09.13 |
| [우아한테크코스] 레벨3 레벨로그 인터뷰 후기 (10) | 2022.09.05 |
| [220819] 우아한테크코스 3차, 4차 데모데이 후기 (3) | 2022.08.24 |