그동안 나는 단위 테스트만을 진행해왔다. 도메인 로직이 잘 실행되는지 junit 문법의 Assertions로 테스트해왔다. dao test는 @JdbcTest를 이용하여 단위테스트를 했고, service test는 fake 객체를 만들어주어 단위 테스트를 진행해주었다.
그런데 컨트롤러는 @RestController에서 @RequestBody로 request를 받고, ResponseEntity를 넘겨주기 때문에 웹 애플리케이션을 직접 실행하면서 테스트하지 않는 이상, 어떻게 테스트해야할지 감이 오지 않았다.
RestAssured를 이용하면 API response의 statusCode뿐만 아니라 body에 올바른 값이 담기는지도 테스트가 가능하다! 이번 시간에는 Spring 환경에서의 RestAssured를 이용한 End to end (E2E) 테스트를 기록해보려 한다.
환경설정 (build.gradle)
plugins {
	id 'org.springframework.boot' version '2.6.6'
	id 'io.spring.dependency-management' version '1.0.11.RELEASE'
	id 'java'
}

group = 'com.example'
version = '0.0.1-SNAPSHOT'
sourceCompatibility = '11'

repositories {
	mavenCentral()
}

dependencies {
	// spring
	implementation 'org.springframework.boot:spring-boot-starter-web'
	implementation 'org.springframework.boot:spring-boot-starter-jdbc'

	// log
	implementation 'net.rakugakibox.spring.boot:logback-access-spring-boot-starter:2.7.1'

    // restAssured
	testImplementation 'io.rest-assured:rest-assured:4.4.0'

	testImplementation 'org.springframework.boot:spring-boot-starter-test'

	runtimeOnly 'com.h2database:h2'
}

test {
	useJUnitPlatform()
}
환경설정 (application.yml)
server:
  port: 8081
spring:
  datasource:           # datasource 설정
    driver-class-name: org.h2.Driver
    url: jdbc:h2:mem:testdb
    username: sa
    password:
  h2:
    console:
      enabled: true
AcceptanceTest
컨트롤러가 올바른 api를 호출하는지 테스트하기 위한 부모 클래스이다.
@DirtiesContext(classMode = DirtiesContext.ClassMode.BEFORE_EACH_TEST_METHOD)
@SpringBootTest(webEnvironment = SpringBootTest.WebEnvironment.RANDOM_PORT)
public class AcceptanceTest {
@LocalServerPort
int port;
@BeforeEach
public void setUp() {
RestAssured.port = port;
}
}@DirtiesContext를 이용하면 해당 테스트 종료 후에 컨텍스트를 폐기하고, 새로운 애플리케이션 컨텍스트를 생성해서 사용할 수 있도록 해준다. @DirtiesContext(classMode = DirtiesContext.ClassMode.BEFORE_EACH_TEST_METHOD)의 경우, 테스트를 실행하기 전에 새로운 애플리케이션 컨텍스트를 생성해서 사용할 수 있도록 해준다.
@LocalServerPort 는 application.yml의 port값으로 SpringBootTest를 실행해준다.
@BeforeEach로 RestAssured.port 값을 지정해준다.
LineController 테스트를 위한 LineAcceptanceTest
지하철 노선 관련 컨트롤러 테스트를 작성해보자.
지하철 노선 등록 관련 문서를 보자.

위와 같은 Http Request를 보내주었을 때(given) 위와 같은 Http Response가 오는지(when) 검증(then)해주자.
컨트롤러를 작성하기 전에 TDD 방식으로 진행하기 위해 test code를 먼저 만들어보자.
|
1
2
3
4
5
6
7
8
9
10
11
12
13
14
15
16
17
18
19
20
21
|
@DisplayName("지하철노선을 생성한다.")
@Test
void createLine() {
// given
Map<String, String> params = new HashMap<>();
params.put("name", "신분당선");
params.put("color", "bg-red-600");
// when
ExtractableResponse<Response> response = RestAssured.given().log().all()
.body(param)
.contentType(MediaType.APPLICATION_JSON_VALUE)
.when()
.post("/lines")
.then().log().all()
.extract();
// then
assertThat(response.statusCode()).isEqualTo(HttpStatus.CREATED.value());
assertThat(response.header("Location")).isNotBlank();
}
|
cs |
given() 절에서는 어떠한 Http Request를 보내줄지 지정해준다.
RestAssured.given(), then()에서 .log().all()를 붙일 경우, 콘솔창에서 http log를 확인해줄 수 있다.
위 log에서 body에 어떠한 값이 담겼는지, Http StatusCode 값이 어떤지 확인할 수 있으므로 붙이는 것을 추천한다.
body에는 Http Request json 객체를 넣어주기 위한 params를 보내준다. 우리는 json 객체로 통신할 것이기 때문이다.
|
1
2
3
4
5
6
7
8
9
10
11
12
13
14
15
16
17
18
19
|
@DisplayName("지하철노선을 생성한다.")
@Test
void createLine() {
// given
final LineRequest lineRequest1 = new LineRequest("신분당선", "bg-red-600");
// when
ExtractableResponse<Response> response = RestAssured.given().log().all()
.body(lineRequest)
.contentType(MediaType.APPLICATION_JSON_VALUE)
.when()
.post("/lines")
.then().log().all()
.extract();
// then
assertThat(response.statusCode()).isEqualTo(HttpStatus.CREATED.value());
assertThat(response.header("Location")).isNotBlank();
}
|
cs |
참고로 위와 같이 body 안에 객체를 넣어주는 방법도 좋다.
when()절에서는 이제 어떠한 uri의 api를 호출할 것인지 지정해준다.
when().post(uri), when().get(uri), when().put(uri) 등등이 될 수 있겠다.
then()절에서는 결과를 리턴해준다. extract()를 해주면 response를 얻을 수 있고, 여기에는 statusCode (200, 201, 400, 500 등)와 header, jsonpath 등이 존재한다.
- .log().all()이 없는 경우

- .log().all()이 있는 경우 (좌: given().log().all(), 우: then().log().all())


log로 신분당선이 잘 생성되는지 확인할 수도 있다.
assertThat으로 201 Created가 잘 보내졌는지 확인할 수 있고, header("Location")이 빈 값이 아니라는 걸 확인해줌으로써 새로운 uri 생성 여부도 확인해줄 수 있다.
StatusCode 비교뿐 아니라 아이디 값 비교도 해보자
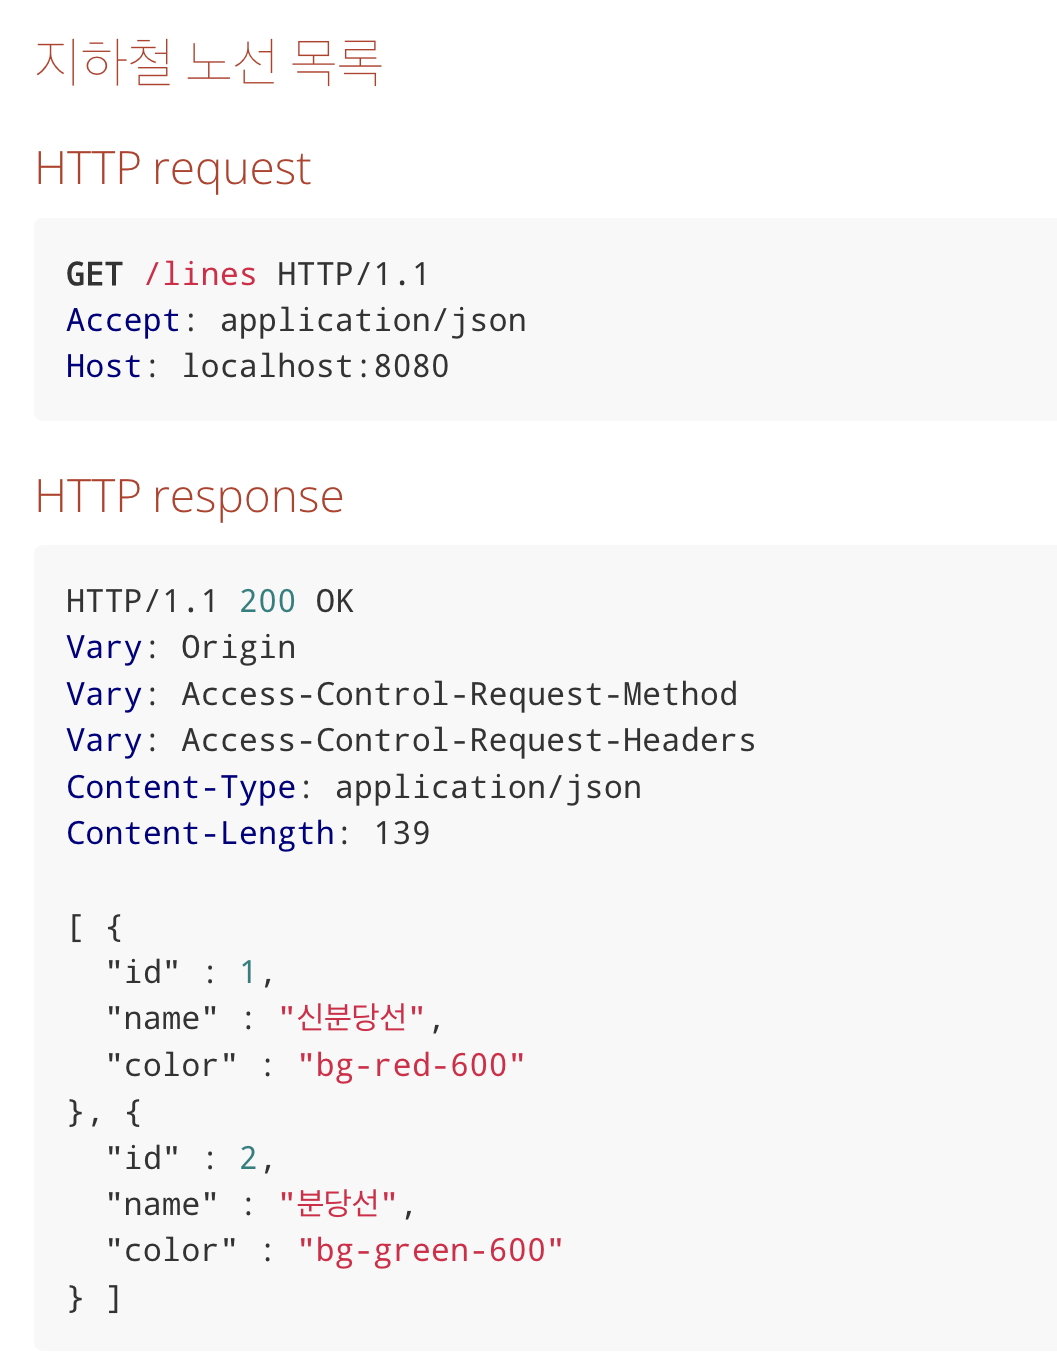
지하철 노선 목록 전체를 조회하는 api를 테스트해보자.

컨트롤러를 작성하기 전에 TDD 방식으로 진행하기 위해 test code를 먼저 만들어보자.
|
1
2
3
4
5
6
7
8
9
10
11
12
13
14
15
16
17
18
19
20
21
22
23
24
25
26
27
28
29
30
31
|
@DisplayName("지하철노선 목록을 조회한다.")
@Test
void getLines() {
/// given
Map<String, String> params1 = new HashMap<>();
params1.put("name", "신분당선");
params1.put("color", "bg-red-600");
ExtractableResponse<Response> createResponse1 = createLineResponse(params1);
Map<String, String> params2 = new HashMap<>();
params2.put("name", "분당선");
params2.put("color", "bg-green-600");
ExtractableResponse<Response> createResponse2 = createLineResponse(params2);
// when
ExtractableResponse<Response> response = RestAssured.given().log().all()
.when()
.get("/lines")
.then().log().all()
.extract();
// then
assertThat(response.statusCode()).isEqualTo(HttpStatus.OK.value());
List<Long> expectedLineIds = Stream.of(createResponse1, createResponse2)
.map(it -> Long.parseLong(it.header("Location").split("/")[2]))
.collect(Collectors.toList());
List<Long> resultLineIds = response.jsonPath().getList(".", LineResponse.class).stream()
.map(LineResponse::getId)
.collect(Collectors.toList());
assertThat(resultLineIds).containsAll(expectedLineIds);
}
|
cs |
// given 에서 지하철 노선을 등록해주었다. (객체 자체를 넣어주는 것도 좋다. 그게 더 편할 것이다.)
// when 에서는 지하철 노선 목록 조회를 하는 api를 실행한 response를 받은 것이다.
// then에서 statusCode가 올바른지 체크해주었는데, 올바른 노선들이 조회됐는지는 어떻게 알 수 있을까?
우선 우리가 api 호출할 때 바라는 노선 id들은 given에서 생성된 노선의 id들이고, 실제 api 호출로 리턴되는 값들은 when에서 받은 response 노선의 id들이다.
- given에서 생성된 노선의 id들
header("Location")을 보면 /lines/3 , /lines/5 와 같이 uri 값이 존재할 것이다. 우리가 api 설계를 그렇게 해놨기 때문이다. 따라서 header("Location")을 split 해주자. 문자열 알고리즘 문제를 푼다고 생각하고 id를 얻어낸다고 생각하면 된다.
- when에서 받은 response 노선의 id들
response에서 id들을 얻어내려면 response.jsonPath()를 뜯으면 된다. 여기에서 우리가 원하는 dto class 형태로 반드시 "."을 붙여준 후에 꺼내주자. 우리는 LineResponse의 id 값들만 얻으면 되므로 map으로 id값들을 꺼내주자.
도움된 글: https://www.tabnine.com/code/java/methods/io.restassured.response.Response/jsonPath
io.restassured.response.Response.jsonPath java code examples | Tabnine
Assert.assertEquals("Should return exactly one variable", 1, response.jsonPath().getMap("").size());
www.tabnine.com

id값들이 일치하여 테스트가 통과하는 것을 확인할 수 있다.
jsonPath()에는 getList()뿐만 아니라 getLong, getJsonObject(), getChar() 등도 존재하므로 적재적소에 이용해보도록 하자.
long expectedLineId = response.jsonPath().getLong("id");
assertThat(resultLineId).isEqualTo(expectedLineId);
단일 id 값이 필요할 때는 위와 같이 getLong()으로 간단히 처리할 수 있다.
|
1
2
3
4
5
6
7
8
|
// then
RestAssured.given().log().all()
.when()
.get("/lines/" + resultLineId)
.then().log().all()
.statusCode(equalTo(HttpStatus.OK.value()))
.body("name", equalTo("분당선"))
.body("color", equalTo("bg-green-600"));
|
cs |
참고로 위와 같이 RestAssured에서 equalTo를 이용하여 assertion 문법 대신 검증하는 방법도 있다. 이 때엔 org.hamcrest.Matchers.equalTo를 사용한다.
이제 e2e 테스트에 대해서도 학습했으니 컨트롤러 테스트도 앞으로 열심히 만들어봐야겠다.
물론 SpringBootTest이다보니 시간은 단위테스트보다 훨씬 걸리긴 하지만, 웹 애플리케이션의 uri들을 일일이 들어가보지 않고 바로바로 테스트가 가능하다는 장점이 워낙 크다보니 훨씬 편리해지고 간편하게 개발이 가능할 듯하다~
'JAVA > JAVA | Spring 학습기록' 카테고리의 다른 글
| [ERROR] Required request body is missing 해결 (0) | 2022.05.09 |
|---|---|
| [ERROR] Request method 'GET' not supported 해결 (0) | 2022.05.09 |
| [Spring] @Transactional로 DB 동시성 문제를 방지하자 (6) | 2022.05.02 |
| [ERROR] GroovyRuntimeException: Conflicting module versions. (feat. java.lang.ExceptionInInitializerError) (2) | 2022.04.23 |
| [ERROR] 406 에러 _ Not Acceptable (스프링 직렬화/역직렬화) (2) | 2022.04.23 |